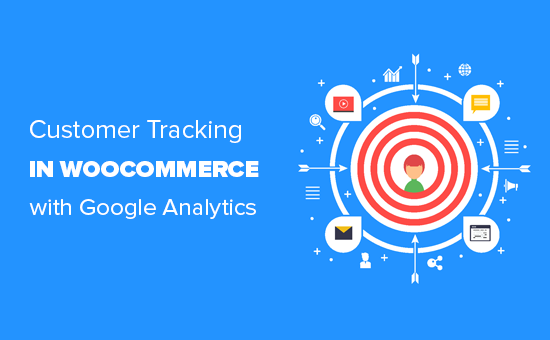
Do you want to enable customer tracking in WooCommerce? Customer tracking allows you to offer a personalized shopping experience based on customer behavior in your eCommerce store. In this article, we will show you how to easily enable customer tracking in WooCommerce with Google Analytics.
Why Enable Customer Tracking in WooCommerce with Google Analytics?
Google Analytics allows you to see where your visitors are coming from and what they do on your website. In other words, it helps you track your traffic sources as well as user engagement on your website.
For eCommerce platforms, Google Analytics offers an enhanced eCommerce tracking feature. Enabling this feature helps you unlock the following reports:
- Shopping Behavior
- Checkout Behavior
- Product Lists Performance
- Sales Performance
Google Analytics can even associate these reports to individual customers by assigning them a unique ID.
However, the problem is that the ID assigned by Google Analytics doesn’t accurately give you information about the user. For example, the same user can use your website from another device and Google Analytics will give them a new ID.
By default, a WooCommerce store allows your customers to create an account or checkout as a guest user. Creating an account helps the user save their shipping and billing information for faster checkout next time. It also helps you offer customers a personalized shopping experience based on their browsing and shopping history.
Wouldn’t it be great if you could track logged in users with their user IDs in Google Analytics? This will give you access to a treasure trove of information and insights on customer behavior which you can use to offer better on-site experience and boost your sales.
Let’s take a look at how to easily enable customer tracking in WooCommerce.
Step 1. Set up E-commerce Tracking in WordPress with Google Analytics
First, you will need to install and activate the MonsterInsights plugin.
You will need to be on the “Pro” plan to access the eCommerce add-on, which we will need for this tutorial.
Upon activation, you will need to connect MonsterInsights to your Google Analytics account. For detailed instructions, see our article on how to install Google Analytics in WordPress.
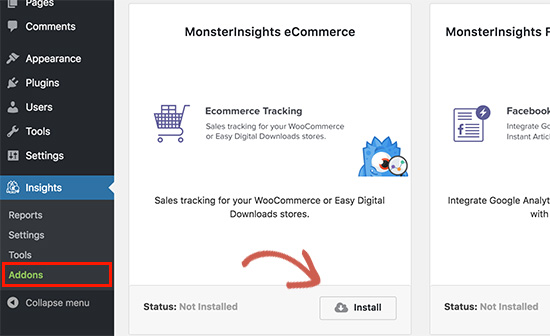
After that, you need to visit Insights » Add-ons page and install ‘MonsterInsights E-commerce’ addon. Once installed, click on the activate button to start using it.
Next you need to visit Insights » Settings page and click on the ‘Tracking’ tab. First, you need to click on the ‘eCommerce’ tab and check the box next to ‘Enhanced eCommerce’.
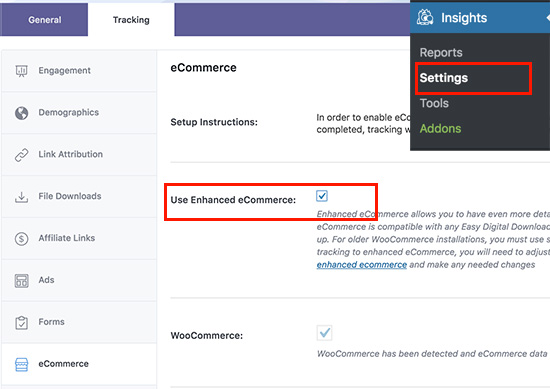
After that, you need to click on the ‘Demographics’ tab and check ‘Enable user ID Tracking’ option.
![]()
Don’t forget to click on the ‘Save changes’ button to store your settings.
Step 2. Enable Enhanced Ecommerce Tracking in Google Analytics
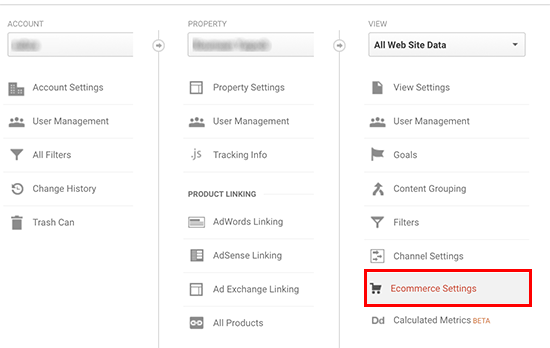
E-commerce tracking is not enabled by default in your Google Analytics account, and you will have to manually enable it. Head over to your Google Analytics account dashboard and switch to the admin page.
Next, you need to click on the ‘Ecommerce Settings’.
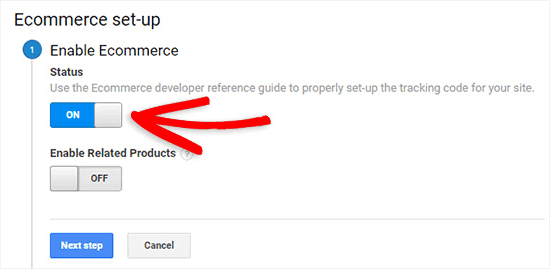
On the settings page, click the slider under the first step, Enable Ecommerce, to turn it on. You need to click on the Next Step button to continue.
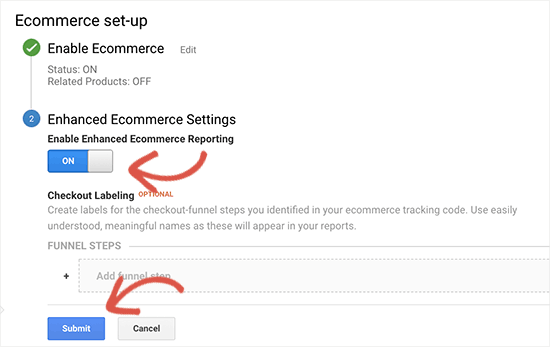
In the next step, you need to turn on ‘Enhanced Ecommerce Settings’ and click on the submit button to save your changes.
Now your Google Analytics account will start showing enhanced eCommerce reports for your WooCommerce store.
Step 3. Enabling Customer Tracking in Google Analytics
Enhanced eCommerce tracking will enable eCommerce reporting features for your WooCommerce store. However, it does not enable user tracking by default.
Let’s change this.
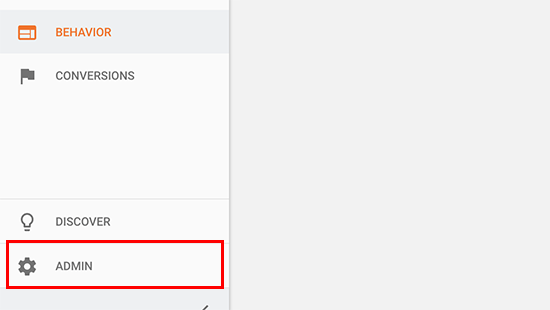
To enable individual customer tracking, you need to visit your Google Analytics account dashboard and open the admin page.
Now click on the Tracking Info link under property column to expand the submenu, and click the User-ID link that appears below.
![]()
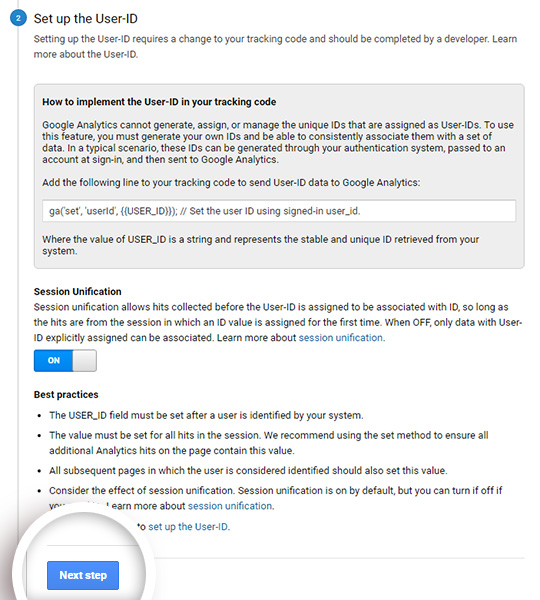
On the next page, you’ll have to review and agree to the user-ID policy and then turn it on.

Click on the ‘Next step’ button to continue.
Google Analytics will now ask how you would like to configure the user-ID tracking. Since you’ll be using MonsterInsights to take care of this, you can just click on the ‘Next step’ button to continue.
Next, you need to click on the ‘Create’ button to enable user ID tracking.
![]()
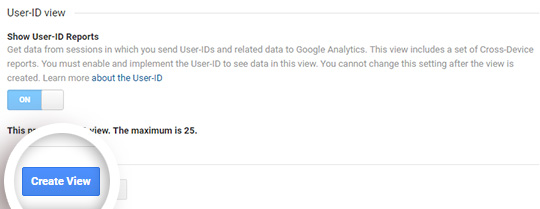
After that, you will be asked to enter a ‘Reporting View Name’, which will be used to display User ID reports. We recommend including UserID in the name, so it is easy to remember which view has UserID tracking enabled.
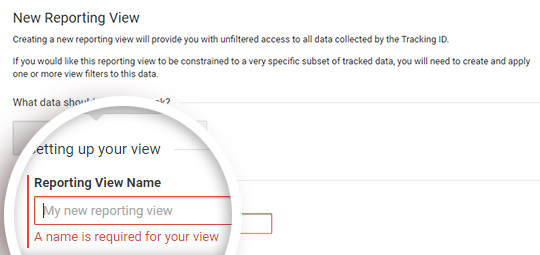
Now you just need to scroll down to the bottom and click on ‘Create view’ button to save it.
Step 4. Viewing Customer Tracking Reports in Google Analytics
Now that everything is set up, Google Analytics will now track all your website customers. It will also be able to track logged in users with their unique WordPress user ID.
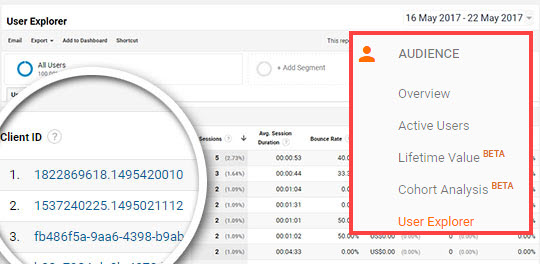
To view all your individual customer activity, you can go to your Google Analytics account and click on Audience » User Explorer menu.
You will see individual customer reports with a unique ID assigned to all non-logged in users.
To view customer tracking report for logged in users in WooCommerce, you need to click on Google Analytics logo on the top left corner of the screen.
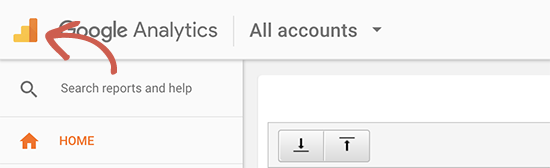
This will show all your Google Analytics profile. You will see your website profile and under ‘All website data’ you will see UserID reporting view you created earlier.
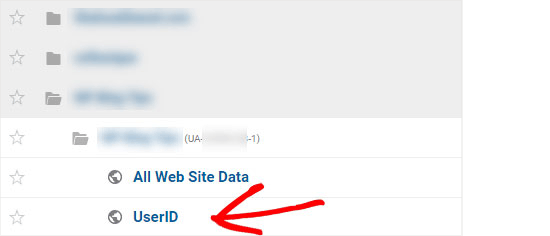
Click on UserID reporting view to load it.
Once it’s loaded, you need to click on Audience » User Explorer menu, and you will see logged in customer tracking report where each user is represented by their WordPress user ID on your website.
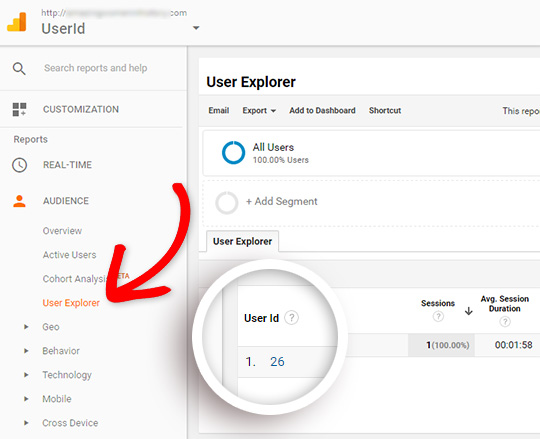
You can click on user ID to view a customer’s individual tracking data.
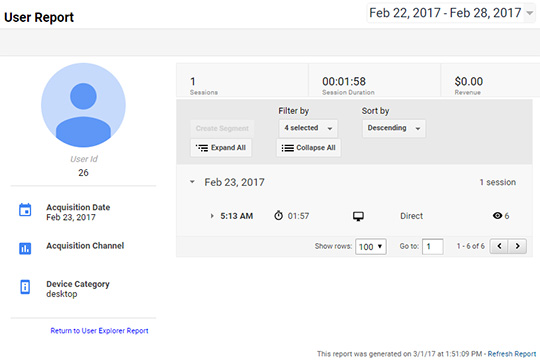
This report gives you a user ID from your WordPress site. You still don’t know who this customer is, and how you can create personalized offers, emails, or shopping experience for them.
Let’s find out.
Step 5. Matching Customer Tracking with Their WordPress Accounts
First, you need to note down the customer ID you see in your UserID reporting view.
After that go to your WordPress website’s admin area and click on the ‘Users’ menu. It will show you a list of all users on your WordPress site.
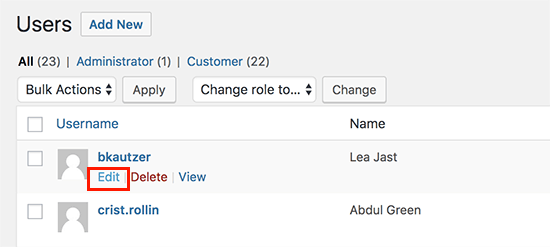
Click on the ‘Edit User’ link below any username in the list. WordPress will now open the user profile for you, and if you look in your browsers address bar you will user_id parameter in the URL.
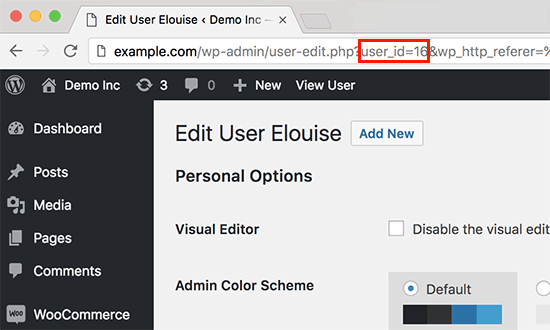
Now you need to replace the value next to user_id with the one you copied from your Google Analytics report and press enter key on your keyboard.
WordPress will now load the user profile associated with that particular User ID. You now have the customer’s name, username, email address, and social media information. You can also track their orders, product views, cart activity, and more.
We hope this article helped you learn how to enable customer tracking in WooCommerce with Google Analytics. You may also want to see our expert pick of best free WooCommerce plugins for your online store.
