
Do you want to add image icons to your WordPress navigation menus? Recently, one of our users asked for an easy way to add menu icons. In this article, we will show you how to add image icons with navigation menus in WordPress.
Why You Should Add Image Icons with Navigation Menus?
Usually, WordPress navigation menus are plain text links. These links work for most websites, however, you can make your navigation menu look more interactive by adding image icons.
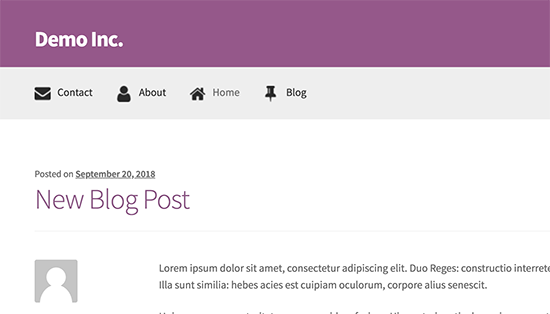
Image icons can also be used to make your menu more noticeable. For example, a beautiful image icon next to your contact page can make it stand out among other links in your menu.
With that said, let’s take a look at how to easily add image icons with navigation menus in WordPress.
Method 1: Adding Menu Icons Using a Plugin
This method is easier and it’s recommended for beginner users because it doesn’t involve code.
The first thing you need to do is to install and activate the Menu Image plugin.
Upon activation, you need to visit Appearance » Menus page.
From here, you can click on any menu item in the in the right column to expand it. You’ll see the ‘Menu image’ and ‘Image on hover’ buttons in settings for each item.
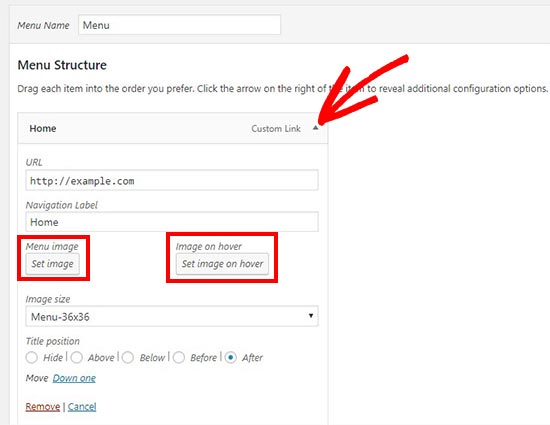
Using these buttons, you can select or upload the menu image icon you want to use. If you want, then you can just upload a menu image and ignore the hover image.
In the ‘Image size’ drop-down, you can select a size for the image icon. This size will apply to both the menu icon image and image on hover.
The plugin comes with multiple options to choose from. However, we recommend keeping menu icons small by using 24×24 or 36×36 sizes.

If you want to add your own custom size for the menu images, then you can do that by adding this code to your theme’s functions.php file or site-specific plugin.
|
1
2
3
4
5
6
7
8
9
10
11
12
|
add_filter( 'menu_image_default_sizes', function($sizes){ // remove the default 36x36 size unset($sizes['menu-36x36']); // add a new size $sizes['menu-50x50'] = array(50,50); // return $sizes (required) return $sizes; }); |
You can also set the title position above, below, before, or after the image icon. It also allows you to hide the title and only display the image icon for each navigation menu.

Once you have configured the settings, simply add image icons to all your navigation menu items separately. Next, you need to click on the ‘Save Menu’ button to see menu icons in action.
Method 2: Adding Menu Icons Using Code Snippet
This method is for more experienced users who know their way around CSS.
First, you need to visit Media » Add New to upload all your image icons in WordPress. Once uploaded, you need to copy their URLs and paste them in a text editor like Notepad.
Next, you need to go to Appearance » Menus and click on the ‘Screen Options‘ button at the top right corner of your screen. In the screen options, you need to check the ‘CSS Classes’ option.
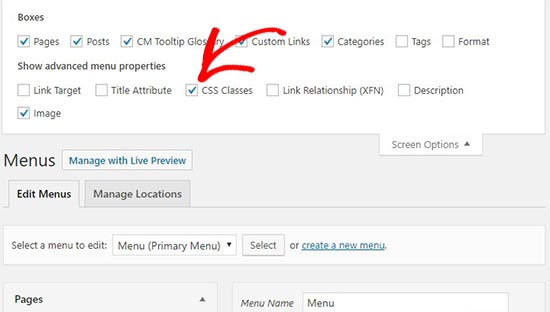
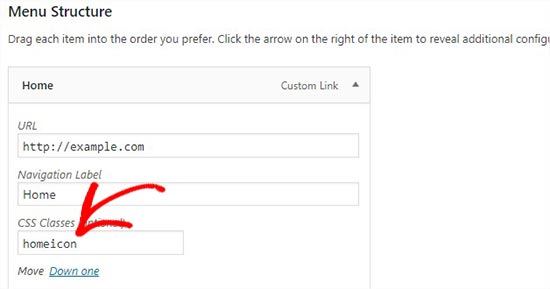
After that, scroll down and click on any menu item to expand its settings. You’ll notice a ‘CSS Classes (Optional)’ field where you need to add a CSS class name for the menu item.
Now you need to add this custom CSS to your theme.
|
1
2
3
4
5
6
|
.homeicon {background-image: url('http://www.example.com/wp-content/uploads/2018/09/home.png');background-repeat: no-repeat;background-position: left;padding-left: 5px;} |
In this CSS snippet, .homeicon is the class name that you added in the CSS Classes field above.
Depending on your theme, you may need to tweak the CSS a little bit to get the perfect place for menu icons. Once you are satisfied with the result, repeat the process for all menu items.
That’s all. We hope this article helped you learn how to add image icons with navigation menus in WordPress.
