Are you looking for a way to automatically manage WordPress updates? Updates are important for security and stability of your WordPress site. In this article, we will show you how to better manage automatic WordPress updates.
Why and Who Needs Better Automatic Updates in WordPress?
By default, WordPress can automatically update itself when a security or minor release is available. For major releases, you have to initiate the update yourself. You also have to install plugin and theme updates manually as well.
Keeping your WordPress site updated is extremely important.
Same goes for all plugins and themes installed on your website. You need to install updates for themes and plugins to get new features and fixes.
However, you may have noticed that some of them are updated more frequently than others. A lot of popular plugins are updated almost weekly.
Some users find it a bit annoying that whenever they log in there are new updates available for one or more plugins, WordPress core, or theme. It becomes even more time consuming when you manage multiple WordPress sites.
Wouldn’t it be better if you could set up WordPress to automatically install updates for WordPress core, trusted plugins, and themes?
Let’s see how you can take total control of WordPress and minimize the time spent on installing updates.
Setting up Easy Updates Manager
The first thing you need to do is install and activate the Easy Updates Manager plugin.
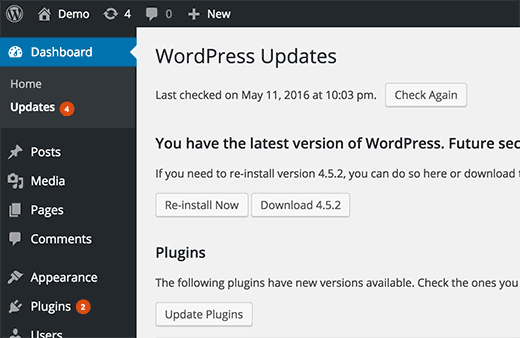
Upon activation, you need to visit Dashboard » Updates Options page to set up the plugin.
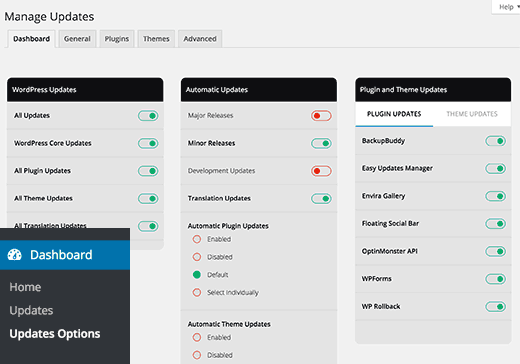
The plugin’s settings page is divided into different tabs. You will land on the Dashboard tab which has three columns and two rows.
This page provides you quick access to turn off updates for WordPress core, plugins, themes, translations, etc. The default settings here are recommended for all WordPress site owners.
We strongly recommend not to turn off updates for WordPress core, plugins, or themes. It will seriously compromise your site’s security and health.
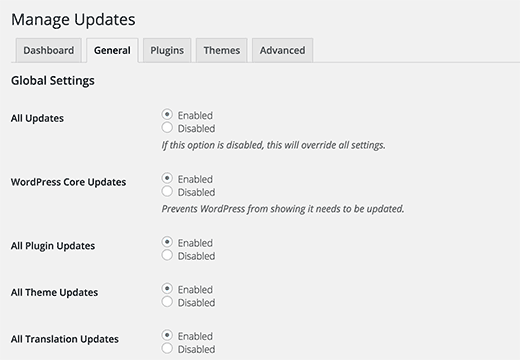
Next, click on the General tab in plugin settings. This page provides you access to Enable or Disable WordPress updates globally on your site.
Setting Up Automatic Updates for WordPress, Plugins, and Themes
Easy Updates Manager allow you to quickly enable automatic updates for WordPress core, plugins, and themes.
Go to the plugin’s settings page and click on the General tab. After that scroll down to the automatic updates section.
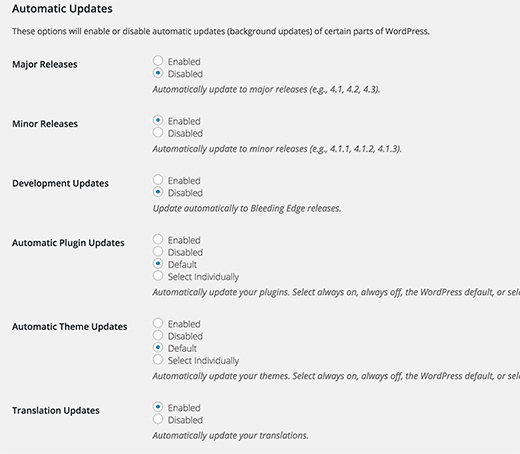
Here you can quickly turn on automatic updates for Core, plugins, or themes. Simply click on enable and then click on save changes button to store your settings.
This plugin also allows you to selectively turn on automatic updates for some plugins or themes. If you would like to selectively turn on automatic updates, then click on ‘Select Individually’ next to the Automatic Plugin Updates option.
Set Automatic Updates for Select Plugins and Themes
If you selected to individually enable automatic updates for few plugins, then you need to switch to the plugins tab under plugin settings.
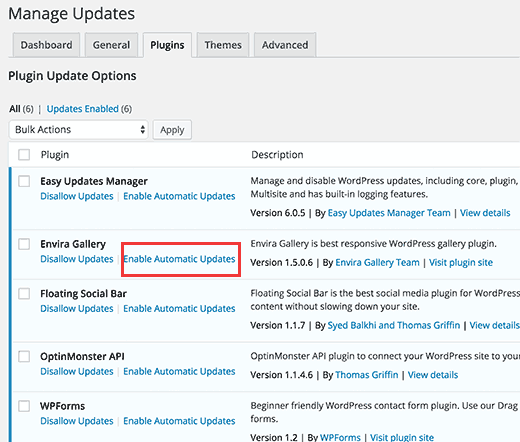
Here you will see a list of all plugins installed on your WordPress site. Below each plugin, you will find a link to enable automatic updates for that plugin.
Switch to the Themes tab, and you will see a list of themes installed on your site.
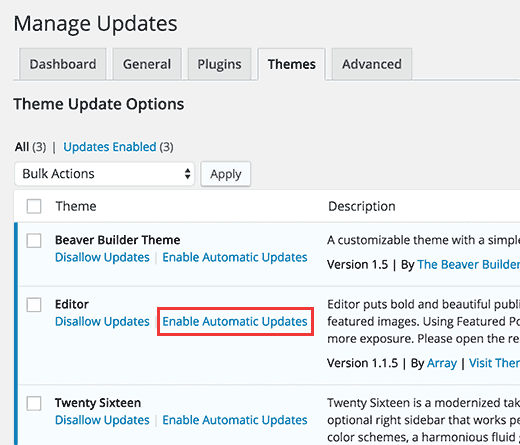
Simply click on enable automatic updates for themes that you want to be automatically updated.
How to Rollback to a Previous Version of Plugin or Theme After Update?
Plugin or theme incompatibilities is the major reason why some users are hesitant when it comes to updating. Even though most good developers thoroughly test their plugins, there can still be bugs that can cause your site to break.
However, restoring your WordPress site from a backup can be a lot of work. If you know what plugin or theme update caused the problem, then it would be easier to just rollback the update.
Here is how you can easily rollback plugin or theme updates.
The first thing you need to do is install and activate the WP Rollback plugin.
Upon activation, go back to the plugins page on your WordPress site. You will notice a new Rollback option below each plugin installed on your site.

Clicking on Rollback will allow you to rollback your plugin to any previous version you want. It can also rollback theme updates.
We hope this article helped you find a better way to manage automatic WordPress updates on your site.
