
Do you want to be able to accept donations on your nonprofit website? WordPress makes it easy for nonprofits to create a donation form and accept donations from their website. In this step by step guide, we’ll show you how to set up your own custom WordPress donation form, step by step.
The simplest way to solicit donations on your website is by adding a Paypal donate button, but it’s not the right solution for everyone.
Creating a custom donation form on your website instead of using a donation button allows you to:
- customize the form fields to gather the information you need
- keep donors on your own website for a more professional experience
- ask donors if they want to subscribe to your email newsletter in the same form
- use other payment processors besides Paypal, such as credit cards (Stripe)
- integrate with other third-party software such as a CRM or cloud storage
As you can see, there are plenty of benefits to keeping donors on your own website instead of redirecting them to Paypal.
You might think setting up a donation form on your website would be a tricky process, but there are WordPress plugins for non-profits that make it easy.
Having said that, let’s take a look at how to create a custom donation form in WordPress.
Creating a Custom Donation Form in WordPress
WPForms is the best drag and drop form builder for WordPress. It has a beginner-friendly interface and includes pre-built form templates including a donation form template to make the process even faster.
WPForms is a premium WordPress plugin created by WPBeginner’s founder, Syed Balkhi.
To create a donation form that can process payments, you’ll need the Paypal or Stripe addon for WPForms. Both add-ons are included with the Pro and Ultimate licenses.
Step 1: Install and Activate WPForms
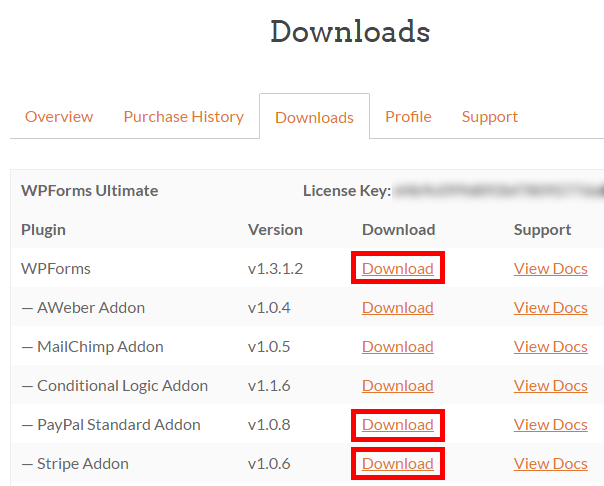
The first thing you’ll need to do is download the WPForms WordPress form builder plugin.
You can do this by logging into your account at WPForms and download the plugin.
 +
+
Then you’ll need to install and activate the plugins.
Step 2: Create Your Donation Form
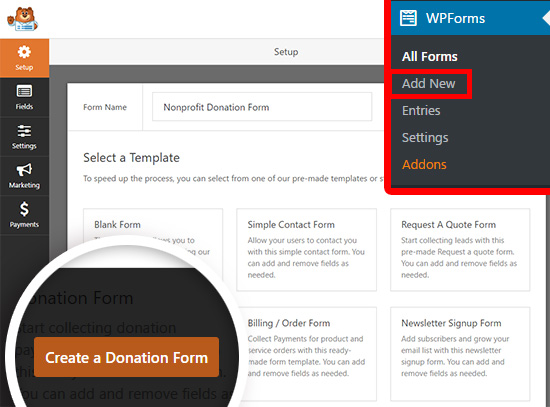
Now that WPForms has been installed and activated, you can go ahead and click on WPForms » Add New to get started.
You can name your form at the top of the page. We’re going to name ours “Nonprofit Donation Form.”
You’ll see a list of pre-built form templates you can choose from. Hover over the Donation Form template and then click the Create a Donation Form to build your form.
You’ll see a popup reminder that says “Don’t Forget: Click the Payments tab to configure your payment provider.” We’ll do that in the next step. For now, you can click OK and take a look at your form.

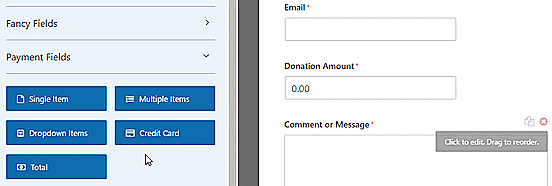
The donation form template includes fields for:
- Name
- Donation Amount
- Comment or Message
The Donation Amount field is a Single Item field where users can type in any amount they want to donate. You can also use multiple choice or drop-down fields instead.
In this tutorial, we’ll show you how to add a multiple-choice payment field with several donations amounts to choose from, and an option to enter a different amount.
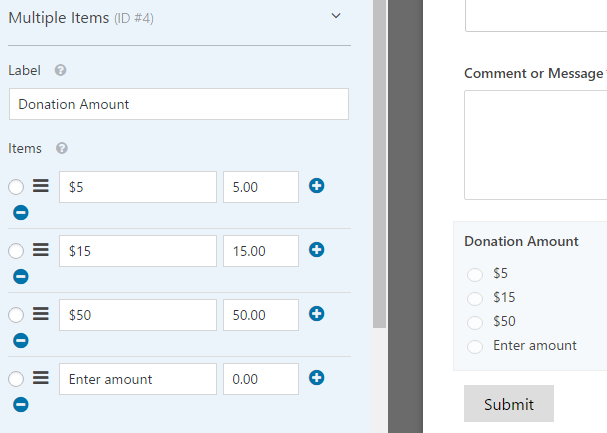
To add the multiple choice payment field, click the Multiple Items button under Payment Fields. You can drag and reorder the fields so that the Multiple Items field is directly above the Donation Amount field.
Now you can click on the Multiple Items field in the form preview to change the options.
Go ahead and change the label to say “Donation Amount.” Then you can enter whatever amounts you want, and an “Enter amount” option.
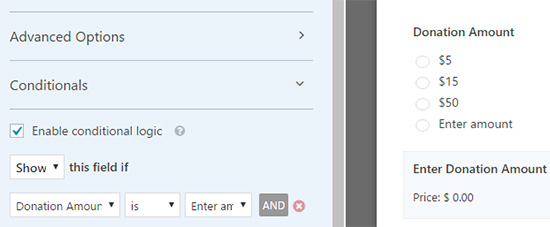
Now we need to change the Single Item field to only display when the “Enter Amount” option is selected.
Click the Single Item field to edit the options. Make sure the “Required” checkbox is not checked, or it will prevent users from submitting the form if they selected a donation amount in the multiple choice field above.

Now you can scroll down a bit and click Conditionals to enter the display settings for this field.
Next, check the “Enable conditional logic” checkbox. Then select the option to Show this field if “Donation Amount” is “Enter amount.”
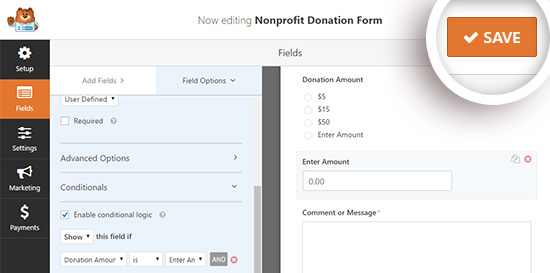
Make sure to click the Save button at the top right to save your changes.
Step 4: Set Up Payment Integration
Next, we’ll set up the payment processor for your donations.
In this tutorial, we’ll walk you through setting up an integration with Paypal.
Setting up credit card payments with Stripe is very similar. For more details, you can check out this tutorial on using the WPForms Stripe addon.
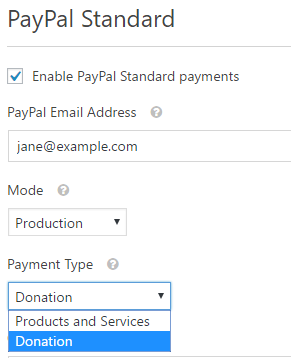
You should still be in the form edit screen. From here, you can click on the Payments tab on the left and then click the Paypal Standard option.

Now you can input your settings on the right side of the screen. First, check the Enable PayPal Standard payments checkbox and enter your Paypal email address. Then make sure to select Donation in the Payment Type drop-down.
 +
+
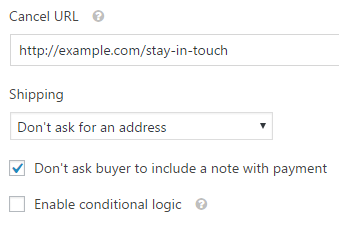
Below that, you can enter a URL to send visitors if they cancel the checkout process. This might be a good opportunity to try to re-engage with users by sending them to a relevant blog post or asking them to follow you on social media to stay in touch.
You can also customize the shipping address options, and choose whether to ask donors to include a note during the Paypal checkout.
For this donation form, we don’t need to use conditional logic. But you could do this if you wanted to add a donation option to another form, such a survey. Then the payment would only process if the user selected the donation option.
Be sure to click the Save button after you configure all your options.
Step 5: Customize Your Notifications
Next, we’ll need to make sure that donors are receiving a confirmation email after they donate.
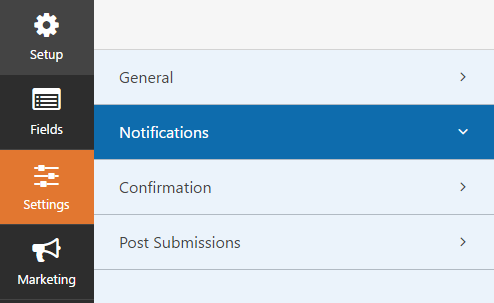
To customize the email notifications for your form, you can click on Settings » Notifications.
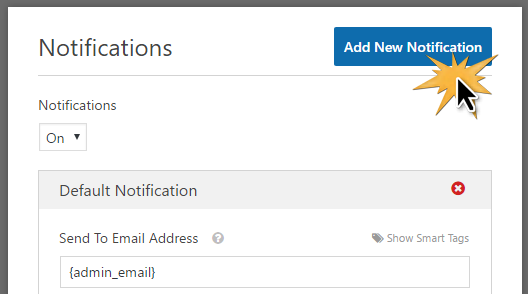
You’ll see there’s a default notification that will be sent to the site administrator. You can click the Add New Notification button to create a separate notification for the donor.
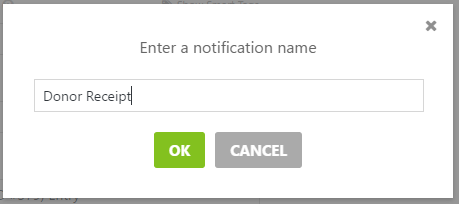
Name your new notification in the popup window and click OK.
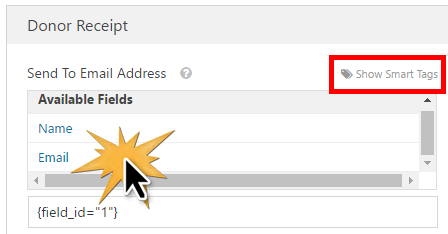
We’ll need to make sure this notification gets sent to the donor’s email address that they entered into the form. Next to Send to Email Address, click Show Smart Tags. In the list that appears, click Email. You’ll see a smart tag such as appear{field_id="1"}.
Now you can scroll down to customize the message the donor will receive.
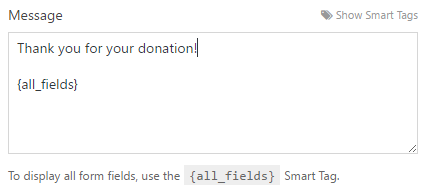
Don’t forget to click the Save button when you’re finished setting up your notifications.
Step 6: Place Your Donation Form on Your Site
Now that your donation form is complete, you’ll need to place it on your website.
With WPForms, you can easily embed your form in any post or page using a shortcode or even place a donation widget in your sidebar or footer.
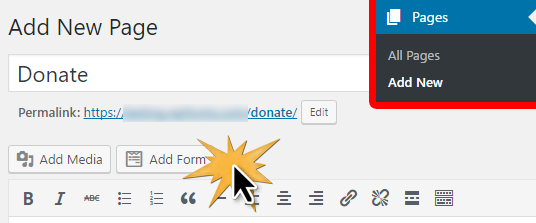
We’ll create a dedicated donation page to display your form.
First, click on Pages » Add New. You can enter a title for your page (we chose “Donate”). Then click the Add Form button.
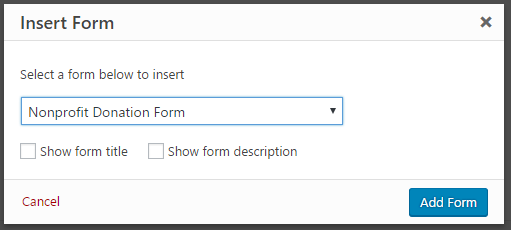
Select your form from the drop-down field. Then click the Add Form button.
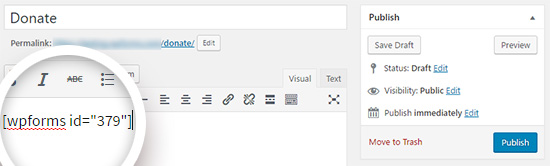
You’ll see a shortcode appear within your page. You can add any text or images you like to the page. When you’re ready, click the Publish button.
Don’t forget to add your new donation page to your navigation menu so visitors can easily find it.
That’s it! We hope this article helped you learn how to create a nonprofit donation form in WordPress.
