
Ever wanted to display a visual sitemap in WordPress? A visual sitemap allows you to present a hierarchical layout of your different pages and sections. In this article, we will show you how to create a visual sitemap in WordPress without writing any code.
Difference between HTML, XML, and Visual Sitemaps in WordPress
An XML sitemap is generated for machines and search engines. It uses XML markup language to represent the contents of your site.
Search engines can use these sitemaps to prioritize and adjust the crawling rate for your website.
On the other hand, an HTML sitemap is intended to be used by your website visitors (real people). It simply displays a list of your pages and different sections of your website on a single page.
While the HTML sitemap is great to show your site’s structure, sometimes it isn’t the ideal option to display the hierarchy of your website.
This is where a visual sitemap comes in handy. It allows you to show items, child-items, sibling items in a tree-like structure.
Having said that, let’s take a look at how to easily add a visual sitemap in WordPress.
However, if you just want to follow text-instructions, then you can follow our step by step tutorial on how to How to create a visual sitemap in WordPress.
The first thing you need to do is install and activate the Slick Sitemap plugin.
Now before you set up the plugin, you need to create a navigation menu in WordPress.
Using the WordPress navigation menus, you can create menus with sub-menus, and sub-menus can have their own sub-menu items.

This navigation menu will have all the pages or posts that you want to display in your visual map. You can name this menu Visual Sitemap and save it.
You can also create another menu or use an existing menu with just a few important pages. This menu will be used as the utility menu on top of your visual sitemap.
Once you have created the menus, it is time to set up your visual sitemap. Visit Settings » Slick Sitemap page to configure the plugin.
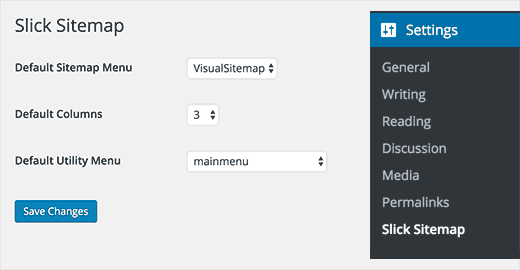
In the default sitemap menu option, you need to select your main visual sitemap menu. Choose the number of columns you want to be displayed.
Lastly, you need to choose the utility menu and click on the save changes button to store your settings.
Displaying Visual Sitemap on Your WordPress Site
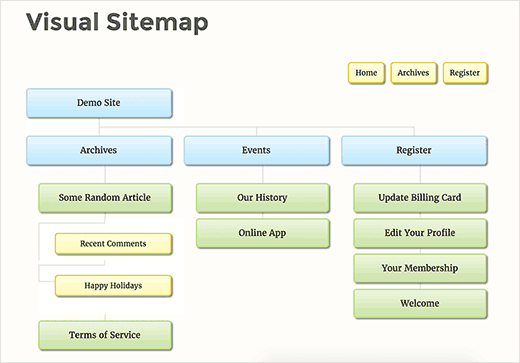
Now that you have successfully created and set up a visual sitemap, the next step is to display the sitemap on a page in your WordPress site.
Simply create a new page in WordPress and add this shortcode in the content area.
[slick-sitemap]
After that click on the save or publish button to store your changes. You can now visit this page and see the visual sitemap in action.
We hope this article helped you add a visual sitemap in WordPress.
