Are you looking for a reliable backup plugin for your WordPress site? Whether you run a small personal blog or a business website, we highly recommend that you set up an automated backup solution for your WordPress site. In this article, we will show you how to keep your WordPress content safe with BackupBuddy.
Why You Need a WordPress Backup Plugin for Your Site
All websites on the internet are vulnerable to security threats. Any website can fall prey to hackers, data loss, or server disasters.
This could happen to anyone, whether you are using a WordPress site or not. Anyone with experience can tell you the question is not if it will happen, it is when it will happen.
The first step to protect yourself against such disasters is by implementing an automated backup solution.
Just like your computer, you can backup your website and store backups on separate locations. This allows you to easily recover your website when you need it.
If you do not update your website on a regular basis, then you can probably create a manual database backup and download your WordPress files.
This is where BackupBuddy comes in. It is a WordPress backup plugin, which allows you to automatically create complete backups of your WordPress site and save them on multiple remote locations like a cloud storage service, your computer, FTP server, etc.
Installing BackupBuddy on Your WordPress Site
First, you will need to purchase the BackupBuddy plugin. The pricing starts from $80 which gives you access to 1 year of plugin updates and support, 1 GB of cloud storage on Stash, Stash live, and you can use it on 2 sites.
After purchasing the plugin, you need to download it to your computer.
Next, you need to install and activate the BackupBuddy plugin.
Upon activation, you’ll need to add your BackupBuddy license before you can get automatic updates to the latest versions. The plugin will show you a link to the licensing page.

You can also visit the page by clicking on Settings » iThemes Licensing.
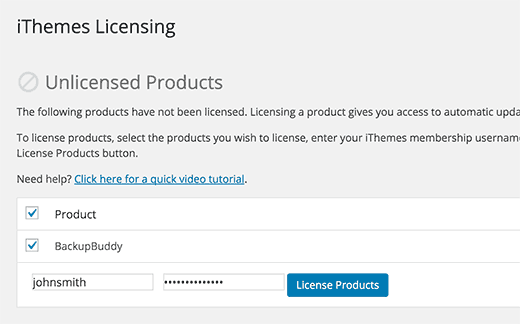
Simply enter your iThemes username and password and click on the license products button to continue. Upon successful verification, your license will be activated.
Setting Up Real-Time Backups with BackupBuddy and Stash Live
Your BackupBuddy plugin gives you access to Stash Live. It is BackupBuddy’s real-time backup storage system.
With real-time backups, changes to your WordPress posts, pages, media, themes, and plugins will be automatically stored in your Stash live cloud storage.
This ensures that you always have the latest and most up to date backup of your site. Stash Live also makes it super easy to restore your website with just one click.
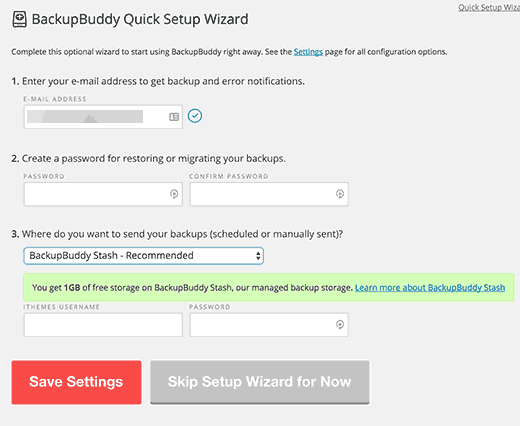
Simply visit BackupBuddy » Stash Live page in the WordPress admin area and fill in your iThemes username and password.
You also need to provide an email address where you want to receive new backup notifications. These emails will contain a link to the zip downloads.
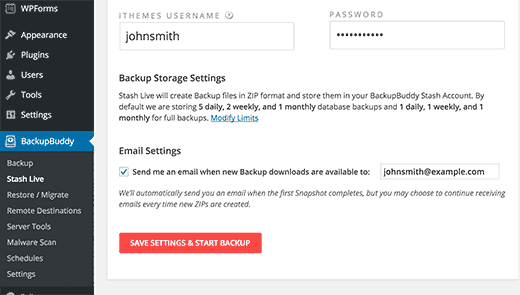
Click on ‘Save settings and start backup’ button to continue.
BackupBuddy will now start creating your first backup and upload it to your Stash account. You will be able to see the backup progress on your screen.
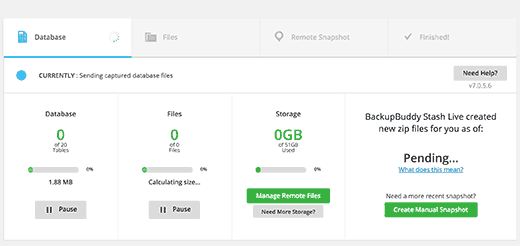
Since this is your first Stash live backup, BackupBuddy will create and upload the complete backup. This can take a few minutes to a few hours, depending on how much data you have on your site.
Leaving the progress screen will not disrupt the backup. You can do other things on your WordPress site and backup will continue running in the background.
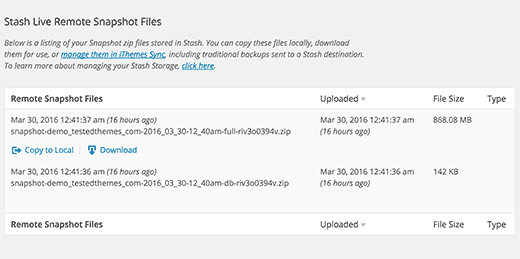
Once it’s finished, you will receive an email notification. You will also see the backup files as snapshots on Stash Live page.
You can leave those snapshots on Stash Live. You can also download these snapshots to your computer or move them to your own server with one click at any time.
Setting up Scheduled Backups with BackupBuddy
Stash Live allows you to have the most up to date backups of your WordPress site with real-time backups.
However, if you don’t want to use Stash life, then there are plenty of other ways to backup WordPress with BackupBuddy.
Simply visit BackupBuddy » Backup page to create and set up backups.
First, you need to provide an email address. This is where BackupBuddy will send you email notifications and backup emails.
Next, you need to provide a password. This password will be used if / when you are moving your WordPress site to a new server or host using BackupBuddy.
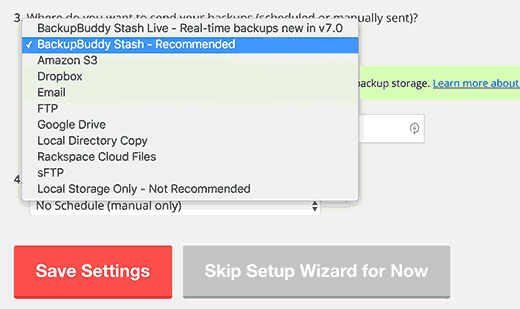
Once you have set your password, then you need to choose where to send your backups.
There are a number of options available. You can store your WordPress backups in Dropbox, Google Drive, Amazon S3, BackupBuddy’s Stash storage, among other options.
Lastly, you need to select how often you want to create backups. You can create manual backups on demand, or select a monthly or weekly full backup option with daily database backups.
Click on the Save Settings button to continue.
BackupBuddy will now show you the backup profiles page. You can click on Database or Complete Backup profiles to create your first backup.
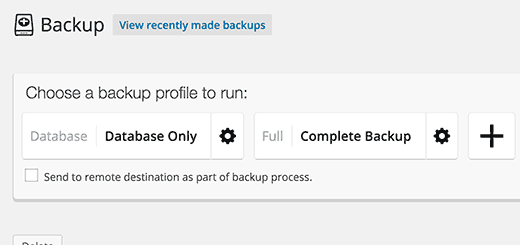
Since you haven’t created backups before, we recommend you to click on full backup profile.
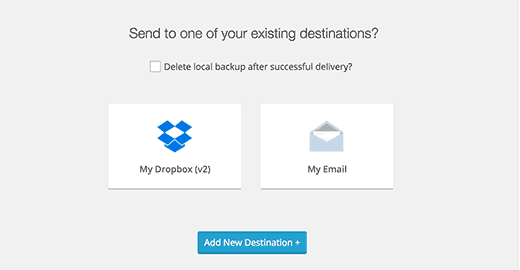
Make sure you check the box next to ‘Send to the remote destination as part of the backup process’ option. This will bring up a popup from where you can select one of the destinations you added earlier.
BackupBuddy will start creating your backup files. You will be able to see the progress of the backup. Once it is finished, you will see a success message.
You can now check your chosen remote destination to make sure that your backup was successfully transferred.
Restoring a WordPress Backup with BackupBuddy
BackupBuddy not only makes it easy for you to create backups, but it also lets you restore your site from backups just as easily.
Simply go to BackupBuddy » Restore/Migrate page and scroll down to your backup section. There you will see the link to browse or restore files and database rollback.

For a full restore, you will need to download and upload the importbuddy.php file to your server.
We hope this article helped you keep your WordPress content safe with BackupBuddy.
